The trend toward wrapping together data and security filtering into RESTful web services has only increased in the past few years, and for a lot of good reasons. If the REST API is optimized to return very quickly based on a set of filtering parameters, the performance alone can justify the architecture. However, Tableau is planning to do more with the result set than simply display it directly — Tableau is ready to do deep analysis and discover new insights. Because of this, Tableau’s VizQL engine needs something it can query in many different ways as the basis for a data source connection.
How can we bridge the gap between a JSON (or XML, if anyone still does that) object response and a relational query engine?
What if I told you THIS was all that was necessary on the Tableau Desktop side to build a data source that acts as a “live” connection to a web service?:
Accessing the PL/Python Function in Tableau
Connect to the PostgreSQL database in Tableau Desktop using whatever credentials you created for an end user.
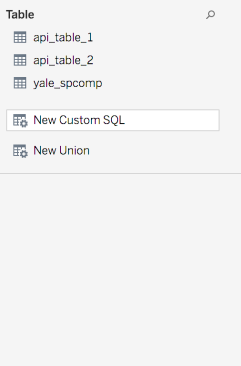
Then on the Data Connection screen, you’ll find on New Custom SQL on the left:
If you drag that out, then the dialog to define the Custom SQL query appears:
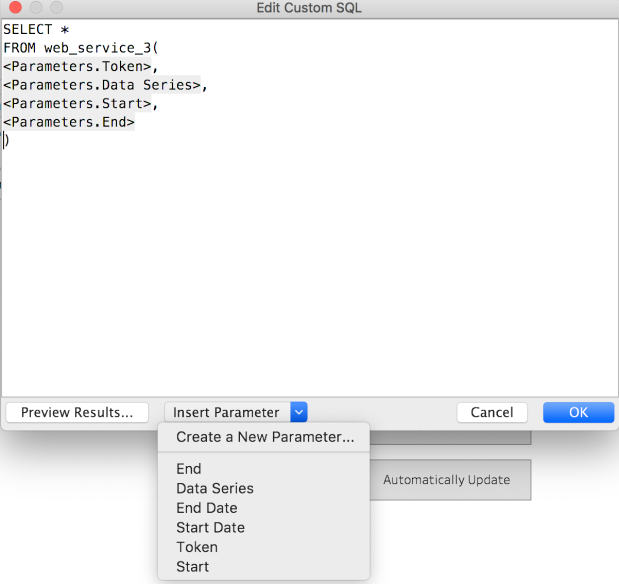
As you can see, the query is just SELECT * FROM function_name( arguments ), with whatever parameters you want to attach. You can create new parameters right from this dialog box, then put them in place. Make sure to give sensible defaults, and probably most should default to an empty string so that someone can only access if they have the right tokens / etc.
How is this possible?
There’s a whole lot of setup on the PostgreSQL side, but the payoff is the simplicity of the setup in Tableau.
The solution is based on the architecture originally laid out here, but I’ve put together a Dockerfile which builds out a PostgreSQL database ready for your custom set of functions which will dynamically call a RESTful Web Service based on Tableau’s parameters.
Overview of Solution
The PostgreSQL database acts simply as a temporary storage location for the Web Service response, with the benefit of being a fully SQL-compliant RDBMS that Tableau has a great Native Connector for. By pruning out old rows at a known frequency, the storage tables themselves never get too large and the responses stay fast back to Tableau.
The end result is a Live Connection in Tableau which requests new data from the Web Service if (and only if) the Tableau Parameters change. It works in the following way:
Tableau Parameters are passed into a PL/Python Function that returns a Table, via Tableau’s Custom SQL dialog
PL/Python is a standard Extension to PostgreSQL allowing you to program your procedure in Python. It uses the system’s local install of Python 3, allowing for the installation of any packages you need to handle the REST API requests (Python requests, for example) using the standard pip installer for Python.
The PL/Python Function does the following:
- Checks and sanitizes the Parameter inputs. For example, encrypted values could be decrypted, or date ranges checked and enforced.
- Constructs a “Unique Request ID” built out of all of the Parameters. This identifies the rows related to this particular request in the database
- Clears out any old responses in the database storage table.
- Determines if there is an existing, non-timed-out response set for this particular set of Tableau Parameters stored in the storage table. If not:
- Makes a Request to the Web Service / REST API. This includes passing through any Tableau Parameter values (which could be a token from another part of a full web application)
- Works through the Web Service response to get to one-dimensional rows of data from the object response.
- Inserts the rows (along with the Unique Request ID and a Creation Timestamp) into a permanent storage table
- Returns the set of rows in the storage table that match the set of Tableau Parameters
Setting up the PostgreSQL Server with PL/Python
A lot of the work in preparing this solution was just getting an isolated PostgreSQL system with plpython3u installed correctly. But like all computing things, once you’ve done it correctly once, it can be automated to take no time and effort the next time.
I’ve put together a simple Dockerfile in my GitHub repository which extends the standard postgres:10 image and installs the necessary packages, including the Python requests package as the postgres user (making it available to PL/Python).
Installing from Dockerfile
Download the Dockerfile to a directory on your computer (assuming you have Docker already installed and working correctly).
Go into the directory and run:
docker build . -t postgres-plpython:latest
This builds the image from the Docker file and gives it a tag to reference it later. We’ll use this tag to actually start up a container based on the image (you must set the POSTGRES_PASSWORD property for it to start up correctly):
docker run -p 54322:5432 -e POSTGRES_PASSWORD={aGoodPassword} -td postgres-plpython:latest
The -p argument maps ports from the container to the outer machine running Docker, in the order: {local-port}:{docker-container-port} . In this case, I’m making the PostgreSQL process run on 54322, while it runs in the standard 5432 actully inside Docker. This is totally up to you — you just have to give the port of the machine to your end users (and make sure to open the firewall for outside connections on it).
If you get back a long ID string, that makes the container now exists and is running. To go in and do things, you do the following:
docker ps
--> CONTAINER ID        IMAGE                       COMMAND                  CREATED             STATUS              PORTS                     NAMES
27c6d8dc4dbd        postgres-plpython:current   "docker-entrypoint.s…"   2 minutes ago       Up 2 minutes        0.0.0.0:54322->5432/tcp
You are looking for the value in the first column (CONTAINER ID), which you will use with any other command.
You’ll want to stop and restart the Docker container after the initial run command so that the Postgres process will restart with all the Python environment in place.
docker stop {Container ID}
docker start {Container ID}
To get into the Container as Root in a bash shell (to do anything else, like run psql commands):
docker exec -t -i {Container ID} bash
Lastly, if you want to see the output of the PostgreSQL process to the shell, use:
docker logs {Container ID}
This is useful when you hit errors and want to get more information (PostgreSQL has relatively verbose and human errors, but you see the most from the output of the main process).
Building Yourself
You might want to set up a Docker container which puts these pieces together in a different way (perhaps you use CentOS, or want to deal with the Alpine images [I tried and was not successful, but that doesn’t mean you won’t be!])
- Create a Docker container from the postgres:10 standard image. (This is a Debian/Ubuntu distribution, so any documentation you might need, look to there). There are lots of great instructions on how to set up and customize how PostgreSQL builds at the home for the PostgreSQL Docker image.
- Make sure to map the PostgreSQL port to the main system. I used port 54322, because standard PostgreSQL port is 5432 . I built from my image using: ‘docker run -p 54322:5432 -td {imageID} ‘ , but there are all sorts of ways to get up a Docker container.
- Go into a BASH shell for the running container:
- docker ps to get the Container ID
- docker exec -t -i {ContainerID} bash
- Run the following commands to install Python 3 and the PostgreSQL extension:
- apt-get update
- apt-get install python3
- apt-get install python3-pip
- apt-get install postgresql-plpython3-10
- su - postgres (this puts us in as the postgres user, where we can install any Python packages we’ll need)
- pip3 install requests (and any other Python packages you want to install to use in your function)
- Now restart your Docker container so the PostgreSQL server will come back up aware of all the newly installed extensions and packages
Enabling PL/Python Functions in PostgreSQL
If you’ve locked things down more in your PostgreSQL deployment (and you probably should), then adjust any of these instructions to involve your users/credentials/databases. These are generic, applied to the standard “postgres” database from an initial naïve install.
All of these commands assume you are using the psql command-line interface. Presumably you could use PGAdmin4 just as easily, as they are just SQL statements (as opposed to psql specific commands).
To get into the docker container with a bash shell, do the following. After the docker ps, look for the CONTAINED ID related to the postgres-plpython:latest image:
docker ps
docker exec -t -i {container_id} bash
Now switch to the postgres user:
su - postgres
Log into the database you are going to use:
psql {dbname} (-U username -P password)
You have to enable the PL/Python extension specific to Python 3:
CREATE EXTENSION plpython3u;
At this point, you may want to create some other users to give access to the database (and any other
Once the extension is created in that database you can declare functions with PL/Python, by ending them with:
LANGUAGE plpython3u;
Remember, every logical database you set up will need the CREATE EXTENSION command run to enable pl/python 3.
If you have additional Python packages you want to install, you’ll need to be the postgres user to do the install and have it available:
su - postgres
pip3 install {package-name}
Creating a Storage Table
Tableau can generate very interesting and complex queries using its VizQL engine, and it will re-query whenever necessary to answer to a user’s interaction (filters, actions, parameter updates in a calculation). For this reason, we don’t want to be re-requesting the data from the Web Service every single time Tableau queries. Instead, we’ll request new data when one of the Function’s arguments (Tableau Parameters) changes, and the rest of the time, return from a permanent table intended to store that response.
This means every PL/Python function needs a corresponding Storage Table, which must be created in the database ahead of time. The benefit of this is that we can correctly define Column Types and add Indexes and other optimizations to the table as necessary to make the SQL queries respond quickly. It also allows for compiling multiple API requests together to allow for comparisons that a single API request cannot handle.
PostgreSQL uses SQL standard table creation statements , so really the challenge is just figuring out which data types each column will be to match to the API response.
For caching and data cleanup, the start of your table should always include a creation_timestamp and a composite_key column:
CREATE TABLE api_table_1 (
  creation_timestamp timestamp, -- use NOW() function
  composite_key text, -- generated
  -- all the other values
);
In the example given below, the CREATE TABLE statement looks like:
CREATE TABLE api_table_2 (
  creation_timestamp timestamp, -- use NOW() function
  unique_request_id text, -- generated in Python code
  trading_date date,
  open real,
  high real,
  low real ,
  last real ,
  volume real,
  open_interest real
);
CREATE INDEX ON api_table_2 (creation_timestamp);
CREATE INDEX ON api_table_2 (unique_request_id);
You’ll notice there is also two CREATE INDEX statements afterwards. It’s hard to think of a situation where this wouldn’t improve performance, but I’ll defer to any PostgreSQL DBAs who think otherwise. You could add any additional INDEXes to columns that you expect people to filter on frequently, although with the small size of the tables and API responses, it may not be necessary.
Building a Web Service Requesting Function
The PL/Python documentation explains that a PL/Python function bridges between the PostgreSQL host using an automatically included plpy module. Other than the initial function declaration and the closing statement, everything else is just standard Python.
The full example is available on GitHub here. Check out the rest of the repository for other example functions and a helper script for analyzing a web service response in Python to build out your function logic.
The PostgreSQL Function part
The Function declaration is PostgreSQL syntax, and it is where you declare the Argument types (these are PostgreSQL types, not Python):
CREATE OR REPLACE FUNCTION
web_service(token text, series_name text, start_date date, end_date date)
RETURNS TABLE(like api_table_2)
AS $
The RETURNS TABLE (like api_table_2) is what lets the function be queried in the FROM clause of a SQL SELECT statement. You change the table name to match whatever you named your storage table for this particular web service request.
PostgreSQL data types get mapped into Python types based on this guide, which is pretty sensible - the one thing to watch out for is that other than boolean, text, numeric or binary, everything else comes through as a string into Python.
You will need to declare these types to match the Parameter types you declare in Tableau — if you a DATE Parameter, you need the input of the function to be date, even though the variable in Python will still be stored as a string. If you don’t want the Tableau calendar widget, it might be easier just to have the Tableau Parameter for any date entry be a string and then just do some parsing within the PL/Python function.
As mentioned before, at the very end of the function you’ll have this line:
$ LANGUAGE plpython3u;
which closes out the function declaration ( the $$ is the stop point for any Python code) and tells PostgreSQL what language the function was written in.
The Python Part
Here’s where all the fun and magic is. If you are not familiar with Python, everything here is in Python 3, which has great documentation and tutorials. Anything referencing Python 3.6 or 3.7 should work (I believe Python 3.7 is what is installed in the postgres:10 Docker image), although there’s very little in the way of esoteric features happening in this example.
We’ll import two libraries (one standard, and one basically a standard), but if you have others (such as a library for your API), you do that up at the top just like this:
import requests
import datetime
As mentioned in the summary, we need to accomplish these steps:
- Check and sanitize the Parameter inputs. For example, encrypted values could be decrypted, or date ranges checked and enforced.
- Construct a “Unique Request ID” built out of all of the Parameters. This identifies the rows related to this particular request in the database
- Clear out any old responses in the database storage table.
- Determine if there is an existing, non-timed-out response set for this particular set of Tableau Parameters stored in the storage table. If not:
- Make a Request to the Web Service / REST API. This includes passing through any Tableau Parameter values (which could be a token from another part of a full web application)
- Work through the Web Service response to get to one-dimensional rows of data from the object response.
- Insert the rows (along with the Composite Key and a Creation Timestamp) into a permanent storage table
- Return the set of rows in the storage table that match the set of Tableau Parameters
I’m actually going to go over this slightly out of order, because the sub-list in Part 4 is the part that actually changes depending on how your Web Service / REST API works and what it responds with
Constructing the Unique Request ID
The idea with a Unique Request ID is that it identifies any rows related to the response from this particular set of Parameters. It could be as simple as a unique session token, or involve any number of parameters. By inserting this on every row, we can easily check for a previous request for the same set of parameters, and then just return those already stored rows in the table, rather than making a new REST API request every time.
All you need to do is build a string (if you are not familiar with Python, the format method replaces any {} with the set of arguments in the order they are passed, and handles type conversions in most cases):
unique_request_id = "{}_{}_{}_{}".format(token, series_name, start_date, end_date)
One variation here is that if one of your parameters (let’s say series_name in this situation) is part of the API request, but you’d actually like to build up the responses from multiple requests in the database (in this case, to allow comparison across multiple series), you might instead exclude it from the Unique Request ID, but still use the value in the Caching / Old Session Checks (covered in a section below). This would allow the user to filter using Tableau (generating standard SQL WHERE clauses) against the series_name if there were multiple.
Making a Web Service request
This is the part that will require the most testing and work. Luckily, the part we are working with is standard Python and could be tested in a separate script or even in the Python command line interpreter.
The requests library we imported is so simple and flexible, there is probably no amount of thanks that wouldn’t be due to its creators and maintainers.
If the Web Service uses a GET request, all it takes to get the response is:
api_params = {'start_date' : start_date, 'end_date' : end_date, 'api_key': api_key}
response = requests.get(url=rest_endpoint, params=api_params)
Alternatively, we might be POSTing:
api_params = {'start_date' : start_date, 'end_date' : end_date, 'api_key': api_key}
response = requests.post(url=rest_endpoint, data=api_params)
# or
response = requests.post(url=rest_endpoint, json=api_params)
And for either post() or get(), if you need to pass something in the HTTP headers (like a session or API token):
api_params = {'start_date' : start_date, 'end_date' : end_date}
api_headers = { 'api_token' : api_token }
response = requests.get(url=rest_endpoint, params=api_params, headers=api_headers)
Now we have a Response object stored in our response variable.
First let’s check if something went wrong:
if response.status_code >= 400:
    return []
Returning a blank List (via return []) is one possible and non-disruptive way to handle errors. You could instead raise some kind of exception that would float up through PostgreSQL through to Tableau, but then your users will ask you why things are broken.
Note for those not used to Python: That is exactly 4 spaces (count them, not a tab) of indentation to start the block under the if. Go out and curse for a while and then come back and reach acceptance. Also use a good IDE like PyCharm which will handle that for you.
Feel free to add any other checking there, but if you think your response returned back something with data, you can access it:
rest_json = response.json()
# or
response_text = response.text
If it is JSON, then requests will go ahead and return it back to you as a Python Dictionary and you can start working with it right away. If you get back CSV or XML, there are Python packages for processing that efficiently too (you would access it via that .text property instead of the json() method.
Determining What is In the Response (just for building / testing)
This section is a slight aside, because it is not part of the final function, but instead describes a few tools in Python to figure out how exactly to access and transform the data that comes back in the response.
You can run the Python interpreter directly on the command line using the python3 command, or write a short .py script and run it as well to test out anything you’d like to do around the web request. For example, we could test almost all of the logic from above, with manual parameters we can adjust, with the following short Python script:
rest_endpoint = 'https://myservice/endpoint'
start_date = '2017-01-01'
end_date = '2019-12-31'
api_key = 'myAPIkey'
api_params = {'start_date' : start_date, 'end_date' : end_date, 'api_key': api_key}
response = requests.get(url=rest_endpoint, params=api_params)
# Some alternative possibilities depending on what your API needs (https://requests.readthedocs.io/en/master/user/quickstart/)
# api_headers = { 'api_token' : api_token}
# response = requests.get(url=rest_endpoint, params=api_params, headers=api_headers)
# This could be requests.post with a payload if the API needs POST methods rather than GET
# response = requests.post(url=rest_endpoint, data=api_params)
# Check for a valid response, if not return no rows
# You could instead through an exception here (https://www.postgresql.org/docs/10/plpython-util.html)
if response.status_code >= 400:
    return []
# Grab the JSON from the response (if your API is returning plain-text or XML, use response.text)
rest_json = response.json()
# response_text = response.text
print(rest_json)
for first_level in rest_json:
    data_in_first_level = rest_json[first_level]
    # Get all the keys listed out
    print(data_in_first_level.keys())
    # In this example, there are many keys to pick from, but the 'data' key
    # returns a list of lists, each representing a one-dimensional row of data
    for second_level in data_in_first_level['data']:
        print(second_level)
        # Print out the row and the Python type of that row
        for col in second_level:
            print(col, type(col))
        break  # Only run through one row, remove to see all
This gives some nice insight into the return types parsed from the JSON response, although you might get some None types and have to look at the documentation (or look for more rows). You need to know the name of the columns and their PostgreSQL types to define the storage table and the INSERT query, so working through the response in this way helps in that discovery process (if you don’t have a well documented API).
Preparing the INSERT query
To pass in values to a query in an efficient and safe way, PL/Python has you create a PLAN, then EXECUTE that plan with the values you want to place in.
The first value of the INSERT query is going to be NOW() because it is our creation_timestamp, but everything after will be a positional variable.
The insert_types list should match the values in order, and says which PostgreSQL type the value will be.
Finally we call plpy.prepare() to get a plan built out, which we will reuse when we go through each row of the response.
insert_query = "INSERT INTO {} VALUES(NOW(), $1, $2, $3, $4, $5, $6, $7, $8)".format(storage_table_name)
# First type will always be text for the unique request id, but other types are up to you
insert_types = ["text", "date", "real", "real", "real", "real", "real", "real"]
# We prepare the query, which we will use over and over for each row to insert
# this might be better implemented with explicit subtransactions https://www.postgresql.org/docs/10/plpython-subtransaction.html
plan = plpy.prepare(insert_query, insert_types)
Inserting the Rows
The biggest challenge in processing a Web Service response is that it is an Object (which can be multi-dimensional), while a database needs Rows with the same number and type of Columns. This is called Object-Relational Mapping and there are all sorts of guides, tools, packages and techniques for handling this problem. Given that you are accessing a Web Service that is intending to provide back data, you can probably handle it all just using Python’s standard for.. in loops.
In the Quandl API I am using in the example function, the response is a complex object, but once you dig into it there is a data key, and it’s value is an List of Lists (or an Array of Arrays). A two-dimension data structure (like this) is also called… a Table. So this API is naturally returning back something already in a table form, we just need to access that part and process through.
You might instead have a response with many nested objects, and you’ll have to think about how to work through those nested objects and flatten them down into one-dimension response rows. In fact, you actually need to do that decision making prior to building your storage table, because you are declaring the column names and types at that point. This also is how you know what to put into the INSERT query from above.
for first_level in rest_json:
    data_in_first_level = rest_json[first_level]
    # In this example, there are many keys to pick from, but the 'data' key
    # returns a list of lists, each representing a one-dimensional row of data
    for second_level in data_in_first_level['data']:
        # You might have additional transformations to do here, if some values are
        # arrays or objects, or have additional levels of depth
        # Any logic to map from Object-to-Relational would happen here
        # Add the unique request id and any other attributes in columns that do not derive from the response
        # The timestamp is added automatically in the prepared query, so you don't need it here
        insert_list = [unique_request_id, ]
        # Now extend the list with the row of data from the API response
        insert_list.extend(second_level)
        plpy.execute(plan, insert_list)
The only requirement here is that you end up with a Python List representing the Row to insert, with data in the right order to match your INSERT query’s substitution variables. In this case, I’m using .extend() to add anything from the list coming out of the data row, to the list I started with the unique_request_id, but you could build each row out however you need.
At this point, you might want to build out a tester function just to make sure everything is requesting and inserting data correctly. Everything else that wraps around it is pretty much generic and only needs slight alterations depending on the Parameters that come in from Tableau.
Requesting from Web Service only when Necessary (testing for existing rows)
The value of storing in a real table is that you only need to make a new request when the parameters change value, or if you think the data is no longer fresh. In the example script, this is handled by two different cleanup timeouts - one for any data, and one for data with the exact same same set of parameters as was just requested.
We clean up all data because it’s possible that one of your parameters is always unique (an API Session token, for example) and might change further up the application chain, and thus any rows from the previous session are left in the database because they would never be cleared by another request with the exact same Unique Request ID again.
For anything with the same Unique Request ID, you may want to set a data freshness limit, anywhere from 5 minutes to 6 hours. How useful this functionality is to you depends on the frequency of updates in the underlying Web Service.
In the example function, the logic is more fully built out, so that the All Cleanup SQL is only executed every 15 minutes, and then only once within that time frame. You could also make a secondary table that stores the last time the cleanup ran (this might be an even better design) and then compare that against the current time.
We’re using the Python datetime.datetime object, with methods .now() and then the .minute property of response to it. The rest of the time math is done in the SQL Queries, using the + ‘- N minutes’ syntax provided by PostgreSQL for time intervals.
# Cleanup old sessions - clean everything more than 24 hours old, and then assign a
# "session cleanup" that cleans out and rerequests from the same unique_request_id after a certain amount of time
all_cleanup_minutes = 60 * 24
param_key_cleanup_minutes = 30
# Only run on certain minutes of the hour
minutes_to_run_on = [0, 15, 30, 45]
right_now = datetime.datetime.now()
all_cleanup_check_query = """
SELECT MAX(creation_timestamp)
FROM {}
WHERE creation_timestamp <= NOW() + '- {} minutes'
GROUP BY unique_request_id
""".format(storage_table_name, all_cleanup_minutes)
all_cleanup_query = """
DELETE FROM {}
WHERE creation_timestamp <= NOW() + '- {} minutes' """.format(storage_table_name, all_cleanup_minutes) if right_now.minute in minutes_to_run_on:     cleanup_check = plpy.execute(all_cleanup_check_query)     if cleanup_check.nrows() > 0:
        cleanup = plpy.execute(all_cleanup_query)
# Check for existing rows with this unique_request_id. Skip the request if it already exists
# Could also include a time-bounding here -- if the data is no longer current, delete rows then request new
composite_param_old_cleanup_query = """
DELETE FROM {}
WHERE unique_request_id = '{}'
AND creation_timestamp <= NOW() + '- {} minutes' """.format(storage_table_name, unique_request_id, param_key_cleanup_minutes) exists_check_query = """ SELECT MAX(creation_timestamp) FROM {}  WHERE unique_request_id = '{}' AND creation_timestamp >= NOW() + '- {} minutes'
""".format(storage_table_name, unique_request_id, param_key_cleanup_minutes)
exists_check_query = """
SELECT MAX(creation_timestamp) FROM {}
WHERE unique_request_id = '{}'
AND creation_timestamp >= NOW() + '- {} minutes'
GROUP BY unique_request_id
""".format(storage_table_name, unique_request_id, param_key_cleanup_minutes)
exists_check = plpy.execute(exists_check_query)
# Only rerun API request if the data doesn't already exist for this combination of arguments
if exists_check.nrows() == 0:
    # This cleans up any old ones just for this particular key
    plpy.execute(composite_param_old_cleanup_query)
    #
    # Make actual request to web service for data
    #
At the end, you can see that we only run an API request if there are no rows of data matching the exists_check_query. This is the caching effect in action.
Returning the Rows from the Storage Table
Regardless of whether the API Request code is run, at the end we just query the Data Storage table along with any WHERE clauses to filter down to the correct response (at minimum, the unique_request_id)
return_query = """
SELECT * FROM
{}
WHERE unique_request_id = '{}'
""".format(storage_table_name, unique_request_id)
return plpy.execute(return_query)
In this case, we’re not creating a plan for use with .execute(), just sending a SQL query as plain text.
Make the Function Accessible
You’ve probably defined the function as a PostgreSQL admin, but you don’t want to give those credentials out to the users who will connect in Tableau.
For any user who you want to connect, you’ll need to create them (with username and password) and then GRANT access. The correct privilege for a function is EXECUTE:
GRANT EXECUTE ON web_service TO tableau_user_1;
Passing Parameters into Tableau Server views
One option, particularly for things like Date Selections or other attributes that you are fine with the user having free reign with, is to show the Parameter Control on your worksheet or dashboard (simply right-click or CMD-click on a Parameter listed at the bottom left of the Worksheet screen and choose Show Parameter Control).
However, this technique is most applicable when integrating Tableau into another web application, and the parameters are used to pass information from that application into Tableau (and then in this case, on to the Web Service).
When you are embedding Tableau, you can pass parameters at load time one of three ways:
- Putting the Parameter value directly in the URL using a name value pair
- Setting the Parameter value using the JS API options object in the constructor method. This actually does the equivalent of #1 and puts the values in the URL
- Use changeParameterValueAsync() method of the JS API.
Only option #3 uses POST, but the downsides are (1) You must load the viz first before sending updates (2) Each update must be sent one at a time, which adds up with a lot of variables. The highest performance technique is to use #2 on load, then send any other updates via changeParmeterValueAsync() (for example if you are using your own UI for a filter dialog box).
WARNING: You do need to make sure that any Tableau Parameter which is used to implement Data Security cannot be easily changed by the end user, because Tableau Parameters can be altered at will. Don’t ever send username in the clear to then drive the API request, or allow for just plain-text values to be sent from your application and insert them directly in. Since the other side is a Function, pass in tokens or encrypted values and let the other side decrypt!
Another option is to use the Extensions API. In that scenario, you would add the Extension to any Dashboard you show, and it would do whatever necessary to get the Parameter security parameters, then use the proper Extensions API code to update the Tableau Parameter:
function setResponseParameter(response_id){ tableau.extensions.dashboardContent.dashboard.findParameterAsync("r").then ( function (param) { param.changeValueAsync(response_id); } ); }Extensions make the most sense if you need to use a Web Services data source internally, accessing directly through Tableau Server.

One comment