For a variety of reasons, Trusted Authentication / Trusted Tickets is often the best choice for SSO into a Tableau Server. Trusted Authentication actually establishes a Tableau Session in the browser, so you can use it once to establish SSO for a whole browser session.
In this post, I’ll describe a best practice method for implementing the Session-Level Sign-O and provide a small JavaScript file with actual implementation of all the concepts.
You can find the auth_helpers.js file on GitHub with all the code necessary for this process (except for the back-end Trusted Tickets request, which you need to build in your own web application environment).
This methods solves several issues that a “naive” implementation of Trusted Authentication might encounter:
- Extending the Session so that the Tableau viz never goes to the Tableau signin page within its frame
- Ensuring that a valid Tableau Session exists prior to loading any content
- Avoids requesting trusted tickets any more frequently than necessary
- By establishing the session prior to loading any visible content to the user, you avoid any race conditions or additional redirects that might be visible
How it Works
- A cookie is stored in the user’s browser that represents the last time a Trusted Ticket was redeemed successfully
- Prior to loading any Tableau content, this “timeout cookie” is checked to see if more than a specified “timeout threshold” has passed
- If still within the “timeout threshold”
- Load any Tableau content, on assumption that the Tableau Session is still valid
- If the “timeout threshold” has been passed:
- Establish a Trusted Authentication session
- Retrieve a Trusted Ticket
- Redeem the Trusted Ticket via an Image Request
- Load the Tableau content
- Establish a Trusted Authentication session
- If still within the “timeout threshold”
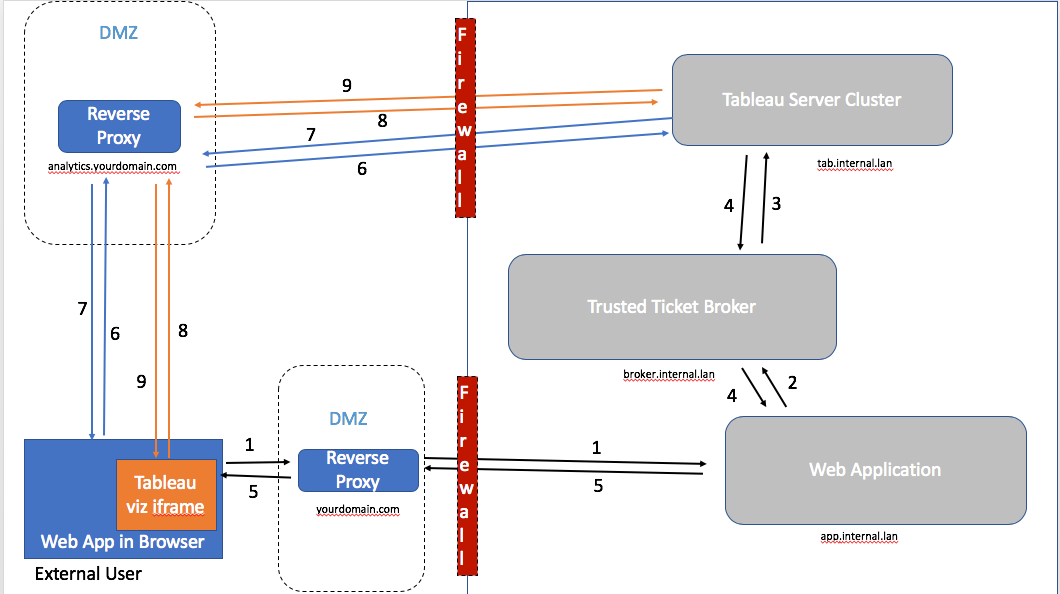
There are three overall parts to the workflow, represented by three colors of lines in the diagrams below:
- Requesting a Trusted Ticker (black)
- Redeeming the Trusted Ticket via a PNG Image Request (blue)
- Loading Tableau Content (orange)
Note that all of the elements in a gray box are represent a resilient, clustered form of those parts of the process
Architecture Diagram, with Ticket Broker
Architecture Diagram, no Ticket Broker (all Web App Servers on Tableau Whitelist)
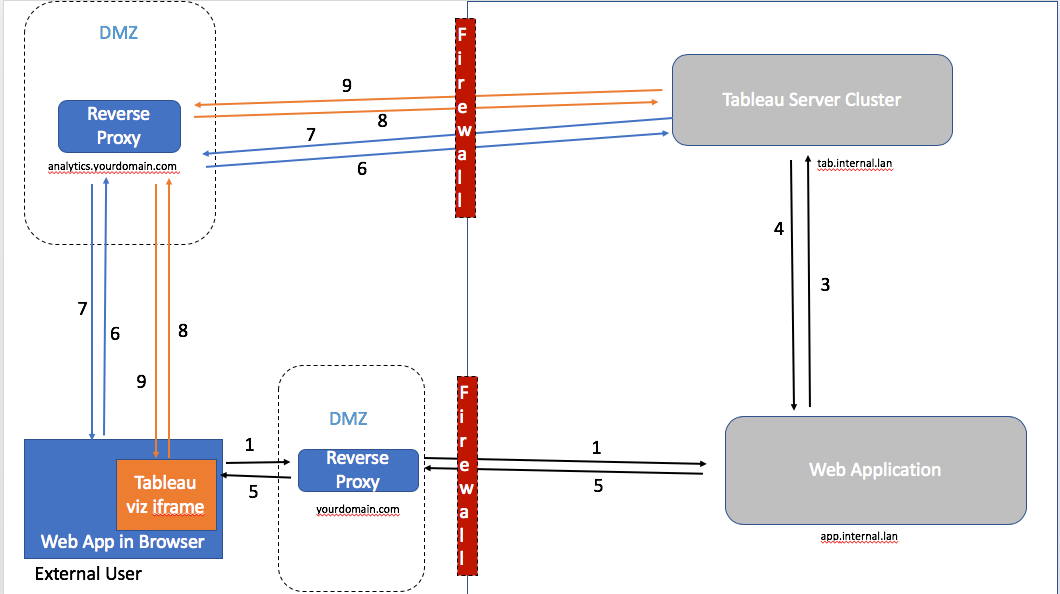
Steps in Order
- If there is a need to do the Tableau Trusted Auth process (based on the Timeout Cookie), the JavaScript of the Web App, in the User’s Browser, sends a request to the Web App for a Trusted Ticket
- If there is a Ticker Broker in the architecture (see below), the Web App sends the request for the Trusted Ticket to the Ticket Broker
- The Ticket Broker (or the Web App directly) requests a Trusted Ticket from the Tableau Server
- Tableau Server returns a Trusted Ticket (or an error) and that is returned to the Web App (either directly or through the Ticket Broker)
- The Web App sends the Trusted Ticket to the browser (or an error response)
- Once the Browser has a Trusted Ticket, it builds a PNG image request to the Login Viz on the Tableau Server, then sends that request
- The Image Request to the Tableau Server should return back with a 200 Response and the Tableau Server session cookies
- The final callback function is called to actually load any Tableau content. This creates an iframe directly to the Tableau Server
- Tableau Server content loads into the iframe and becomes interactive to the user
Requesting the Trusted Ticket
Trusted Authentication is both simple (it is only a POST request) and yet there are several issues which must be overcome in modern web application environments.
Static IP Whitelist
The Tableau Server must be set up with a whitelist of the static IP addresses of any machine that can request a Trusted Ticket. To be able to trust those static IPs, they must be in the same network as the Tableau Server (otherwise you can’t trust the static IP to be a single machine that you trust).
The issue here is that most modern web application architectures are very dynamic, with machines scaling up and down and having their IPs reassigned all the time.
The solution for this is to assign at least two machines, with Static IPs, to the role of a Ticket Broker.
What is a Ticket Broker?
At its simplest form, a Ticket Broker is:
- A web server
- on a Static IP address which is on the Tableau Trusted Whitelist, within the network at the same level as the other web application machines
- that can receive requests for a ticket from any of the Dynamic IP machines within the web application environment
- which then makes a valid Trusted Ticket request to the Tableau Server
- and finally returns that response back to the requesting machine
Notice that the Ticket Broker is not external Internet-facing! If you were to try to make an Internet-facing Ticket Broker, you would need to implement a trusted SSO mechanism like SAML or OpenID Connect, at which point you might just go ahead and implement that with Tableau. Third-party SSO is a difficult thing to do properly, which is why commercial IdPs exist to provide those services. If you and your security team feel you can set this up correctly, you are welcome to, but it is not something that Tableau will recommend or help with.
However, you may want to implement some form of authentication between your Dynamic web app machines and the Ticket Brokers. For example, in our demo application, we send the request from the App Server to the Ticket Broker using a JWT using HTTPS. The Broker service validates the JWT before ever attempting to request a ticket from the Tableau Server. You’ll have to consult with your own security teams as to what level of constraints you want to put around a Ticket Broker within the environment.
Do I need a Ticket Broker?
No, if you have a limited number of web application servers with static IPs, you can just list them all in the Tableau Server trusted whitelist, and each web application server can request its own Trusted Tickets directly from the Tableau Server. The Ticket Broker concept is most useful when you have (1) dynamic IPs or (2) are rapidly adding web application machines and don’t want to disrupt the Tableau Server by constantly restarting to add to the whitelist. Remember, a full Tableau Server restart is required to update the trusted whitelist properties.
Obtuse Errors and Handling
There are a number of conditions that result in a response of “-1”, rather than getting a ticket. Any error handling routine should send a more graceful message to the end user, and respond in an appropriate way within the browser. You’ll want to log the ‘-1’ response and try and trace back why it might have happened.
Additionally, on occasion a whole web page is returned back as well, instead of -1 or the ticket itself (never been exactly sure the cause of that one). Hopefully this is no longer happening in the latest releases, but the point is that you have three possibilities coming back from a trusted ticket request:
- A valid trusted ticket
- -1
- Something else entirely, like the HTML of a whole webpage
So you need to account for all three of those possibilities in your code.
Passing the Trusted Ticket to the Browser on Demand (Make an Endpoint)
Once your web application server has retrieved a valid Trusted Ticket (directly or from the broker), it needs to pass it to the browser so it can be redeemed.
The simplest implementations of Trusted Authentication retrieve the Trusted Ticket prior to a completed page being sent and add the Trusted Ticket directly into the JavaScript of the page on the server-side. This pattern was built around the concept of a single viz loading in a page, where a Trusted Ticket is always redeemed prior to each Viz load. A more robust solution requires a different pattern.
To keep the Tableau Session alive, we instead want to provide an endpoint for the browse to request a new Trusted Ticket on demand. When a given page loads, it may not even need a new trusted ticket, because the existing Tableau Session should last a long time longer. On the other hand, if someone sits on a page doing nothing for a long time, we may want to request multiple Trusted Tickets to continually extend the session.
The endpoint needs to be secured so that a user can only request their own Trusted Ticket when they are logged into the web application. The web app should check for session validity and use only the username (and Tableau site) information based on that user’s session. In the example implementation of this method we use a JWT stored in an HttpOnly cookie which dies at the end of the browser session to store the small amount of information that needs to be sent to the ticket broker.
The “Empty Login Viz” + PNG Request Method
As mentioned in the SSO for a whole browser session post, a Trusted Ticket can be redeemed on a PNG request, which vastly simplifies the load time vs. instantiating the Tableau Viz in an iframe.
You can minimize the load time the most by creating a “Login Viz” that any user has access to it, which consists of the absolute minimum required for a Published Tableau Workbook: (1) A single sheet (2) With a filter set to “All” (3) No Data. You will need to publish this viz separately to every Tableau Site that a user might log in to.
Since this Viz will always render as a blank white screen when requested as a PNG, it will be cached after the first load and return back as quickly as possible.
Putting it all Together into a Workflow
Now that we’ve discussed the aspects of Trusted Authentication, we can work out the full workflow:
- A cookie is stored in the user’s browser that represents the last time a Trusted Ticket was redeemed successfully
- Whenever a user logs into the web app, this cookie should be cleared
- Whenever a user logs out of the web app, this cookie should be cleared
- Prior to loading any Tableau content, this “timeout cookie” is checked to see if more than a specified “timeout threshold” has passed
- If still within the “timeout threshold”, no need to any auth actions
- If the “timeout threshold” has been passed, establish a Trusted Authentication session:
- Request a Trusted Ticket from the Web App, which will either make the request to Tableau Server directly or to a Ticket Broker in it’s environment
- Build the URL to the “Login Viz” with the Trusted Ticket included, as a PNG request
- Create a new Image object in the DOM using the URL you built, which redeems the Trusted Ticket and creates a Tableau Session
- Update the “timeout cookie” with the current time the image request completed successfully
- Load any Tableau content (if you have any). You can always do the Trusted Auth flow on a page that doesn’t display any Tableau content to the user , for example on the first page after login, so that the Tableau Session is established
Working JavaScript Example Code
Making this workflow work in real life, particularly with the number of servers and responses, requires a lot of thought and planning. The rest of the article will present a short library of functions designed to generically handle the workflow, regardless of the particulars of your setup.
This solution relies on JavaScript Promises, but you shouldn’t need to know the full Promises framework to make it work in your environment. The simplest explanation of Promises is that they allow us to specify an order for a set of asynchronous requests, which may come back at any time, and also could possibly have errors at any place in the chain of events.
You’ll notice the code is relatively obfuscated, in the sense that I’m avoiding the word Tableau or Tableau terms — because Tableau is so well documented and this JS code will be available easily to the browser, it shouldn’t reference Tableau too much. You might also want to use an actual obfuscator (example here) on the code you actually deploy in production.
Main Function using Promises
// This is generic promises implementation of a trusted auth flow. Requests ticket -> Reedems via image -> calls callback // Put whatever you want to happen after auth has been verified as a callback function using 'afterAuthCallback' function authThenLoad(serverBaseUrl, site, wb, view, afterAuthCallback){ // Check if the cookie saying the last auth ping is passed its timeout if (isAuthExpired()){ console.log(reauthNecessaryMsg); // Request a tkt via AJAX, return is plaintext // Must set tktEndpoint value somewhere get(tktEndpoint).then( // Redeem function (tkt) { console.log(tktReceivedMsg); var fullAuthUrl = buildAuthUrlPng(serverBaseUrl, site, wb, view, tkt); // This returns a Promise, so we return it out of the function to keep the chain of Promises going return imgLoadPromise(fullAuthUrl); } ).then( // Do whatever you need after the image has been redeemed and cookie set function() { // If the image request completes correctly, you should have a session. Update the timeout cookie extendTimeoutCookie(); console.log(authTimeoutCookieExtendedMsg); // Generic callback to allow you do to anything after auth is established // For example, on initial load, you might then load actual content // Later, an empty function just to extend the session timeout afterAuthCallback(); } ).catch( function(error){ console.log(error); } ); } // If you determine that the auth is already good, just go and do whatever thing you do else{ afterAuthCallback(); } }You may be thinking that this is just a skeleton framework, implementing the workflow mentioned above, without the details. And that is exactly what it is! Definitions for all of of the functions involved are are in the auth_helpers.js file on GitHub.
Anything you actually want to do after the Trusted Auth flow has been completed, should be wrapped up into a function which is passed in as ‘afterAuthCallback‘. You can also pass in a function that does nothing — this is particularly useful when just extending a session on an interval.
Extending the Session Automatically
A major advantage of this technique is that it can be used to continually re-extend a Tableau session by redeeming a new ticket on an interval even if someone sits on a page for a long time. This keeps the Tableau iframe from ever showing the Tableau Sign In page.
To set this up, use the standard JavaScript onInterval(callbackFunction, intervalInMilliseconds) function. Wrap up the authThenLoad() function in another function (called extendAuthSession() below) and pass it an empty function as the afterAuthCallback:
// Obfuscate endpoint name more in real life var tktEndpoint = "/tkt"; var siteContentUrl = 'site_name'; var loginWorkbook = 'EmptyWB'; var loginView = 'Sheet1'; // This one to run on the timeout extension function extendAuthSession(){ authThenLoad(tableauServerBaseUrl, siteContentUrl, loginWorkbook, loginView, function () {}); }; // Set a timeout to run this again after specified time setInterval(extendAuthSession, pingMilliseconds);Loading Tableau Content into the Page after Auth
While the setInterval will continue the Tableau session, you’ll want a second call to authThenLoad() to make sure you have a session, then load any Tableau Content into your page.
Just wrap any Tableau Content loading functions in another function (called loadTableauContent() in the example below:
authThenLoad(tableauServerBaseUrl, siteContentUrl, loginWorkbook, loginView, loadTableauContent );</pre>Clearing the Timeout Cookie to Force a New Tableau Session
There is no “signout” endpoint for Trusted Authentication — the Tableau Session cookie will die based on its natural session expiration, or whenever the browser is closed. The Tableau Session will be overwritten when a Trusted Ticket is redeemed for a different username (or the same username on a different Tableau Site).
To ensure that the Tableau Session is always for the correct username/site combination, you should invalidate the Timeout Cookie at each Web App Login and Web App Logout.
There is an included JavaScript function in the library called invalidateTimeoutCookie() for this very purpose. The function sets the Timeout Cookie value to a blank string. Whenever you use the isAuthExpired() function, it checks to make sure (1) the Timeout cookie exists (2) The value is set to a numeric time string (3) That time value is not further in the past than the specified timeout. By setting the Timeout Cookie value to “”, this forces the isAuthExpired() function to return true, which triggers off the new request for a Trusted Ticket in the authThenLoad() function.

Thank you for very useful article! Would the solution with ticket broker work with the broker service installed on Tableau Server Cluster? Or does it have to be installed on a separate machine/cluster?
LikeLike
I’m sure you could, you can definitely whitelist the Tableau Server itself so that it can request a trusted ticket from itself. You’d have to figure out the ports to not have contention, which can be trouble given how many ports Tableau Server uses. The real issue with the ticket broker is determining a secure method to authorize the machines that have dynamic IPs, which is still up to you. We’ve tested it out with JWTs but you have to make sure you have that working and all configured in a way that you feel is secure
LikeLike
Does this work when trying to load more than one view on an embedded page? We are experiencing problems where we get a ticket from the tableau server but cannot use it more than once.
LikeLike
Hi Charles - yes, with this technique you just redeem one Trusted Ticket and then load all other vizes without any Trusted Ticket involved. You can only use a ticket once (this is a security feature), but after it is successfully used, you will have a Tableau Server session and don’t need any new Trusted Ticket unless you need to establish a new sesssion
LikeLike
Thanks!! Will give it a go!
LikeLike